The Perfect Armor Improved: Water Hardened
Leather
Some years ago, I wrote an article on how to make hardened
leather armor, using beeswax. Since then, I have concluded that although
the method I described works reasonably well for SCA purposes--I have fought
in my wax hardened klibanion for a good many years now--it is quite unlikely
that it is the method used in period for armor.
I reached that conclusion for three reasons:
1. Beeswax is a lubricant. Furthermore, stiffening the
leather makes it easier to cut, just as it is easier to slice meat if it
is half frozen. So although wax hardened leather provides protection against
the sort of blunt weapons we fight with, it would be of very limited usefulness
against sharp swords, arrows, and the like.
2. Although I have found no period descriptions of the
process for hardening leather, the period term for hardened leather is "cuirboulli,"
which translates as "boiled (or cooked) leather." That is not
the natural way of describing the wax hardening process.
3. I have found an entirely different way of hardening
leather which does fit the term and which produces armor that is much better
protection against real weapons. This article describes that process. As
it happens, in addition to being a better guess at what was done in period,
it is also a somewhat better technology for making SCA armor.
How to Water Harden Leather
Take a piece of vegetable tanned leather. Immerse it in
water long enough to get it soaked--ten minutes will do. Heat a pot of water
to 180°. Immerse the leather in the hot water. Watch it.
In about a minute, the leather will begin to darken, go
limp, and curl up. If you pull it out at that point, it will have shrunk
a little, thickened a little, and be stretchy, like a thick sheet of rubber;
at this point it can be stretched and formed. In a minute or two the stretchiness
will go away, but the leather will still be flexible. Over the course of
the next few hours it will become increasingly stiff. You will end up with
a piece a little thicker and a little harder than what you started with.
The longer you leave the leather in the hot water after
the process has started, the more it shrinks, the more it darkens, the thicker
it gets--and the harder the final piece will be. A sufficiently long immersion
gives you something that feels like wood. Unfortunately, when the piece
gets harder and stiffer it also gets more brittle. If I were making lamellar
armor to defend myself against real weapons, I would use a long immersion--and
plan on replacing a few cracked lamellae after each fight. For SCA purposes,
I normally leave the leather in the hot water for about thirty seconds after
the process starts. This gives me, very roughly, shrinkage to about 7/8
of the original dimensions, an increase in thickness of about 25%, and a
piece that is hard but not totally inflexible.
The process is very sensitive to the temperature of the
water, so you will want an accurate thermometer. The timing and the result
also depend to some degree on the particular piece of leather. Instead of
trying to work entirely by the clock, experiment with pieces of scrap until
you have a reasonably good idea of how the leather looks at various stages
in the process and how it comes out when finished, then judge the progress
of your piece in part by time and in part by appearance.
You can also harden leather in in boiling water--considerably
faster. In my experience, about a twenty second boil gives shrinkage to
7/8ths, about a forty second gives you a shrinkage to 2/3 and roughly doubles
the thickness. That has the advantage of not requiring a thermometer.
It has two disadvantages. First, the faster process is
harder to control precisely. Second, the hotter water produces a less uniform
hardening--you tend to get pieces where the surface is harder and more brittle
than the interior, eventually producing surface cracks. I therefore prefer
the lower temperature process. I have not done any extensive experimentation
on what happens at intermediate temperatures.
Easy Projects
Making flat pieces such as lamellae or scales is easy.
Because it is hard to predict the exact amount of shrinkage, you may want
to first to water harden the whole piece of leather, then flatten it under
a cutting board or something similar for a few minutes, then cut out your
lamellae with a utility knife and add holes with a leather punch; at this
stage in the process the leather can still be cut fairly easily.
If I want my lamellae slightly curved in the horizontal
direction, to provide a little additional stiffness and to better fit my
body, I take a cooking pot with a diameter of a foot or more, line up the
lamellae around it while they are still flexible, tie them on with a strip
of rag, and let them dry that way.
 Making a vambrace, a rerebrace, or any other piece that
is curved but not stretched--any shape you could make from a sheet of paper--is
equally easy. Cut the piece of leather a little bigger than you think you
need (remembering to allow for shrinkage), harden it. Wrap a towel around
your forearm to protect it from heat and provide extra thickness to allow
for padding (or wear your gambeson, if it covers your arm). Tie the piece
of leather around your arm with strips of cloth (string will leave marks
on the leather). Leave it there for fifteen minutes or so. Untie it and
take it off, being careful to keep the shape--at this point the leather
is still fairly flexible. Trim off any surplus. Leave it somewhere to dry.
Instant vambrace.
Making a vambrace, a rerebrace, or any other piece that
is curved but not stretched--any shape you could make from a sheet of paper--is
equally easy. Cut the piece of leather a little bigger than you think you
need (remembering to allow for shrinkage), harden it. Wrap a towel around
your forearm to protect it from heat and provide extra thickness to allow
for padding (or wear your gambeson, if it covers your arm). Tie the piece
of leather around your arm with strips of cloth (string will leave marks
on the leather). Leave it there for fifteen minutes or so. Untie it and
take it off, being careful to keep the shape--at this point the leather
is still fairly flexible. Trim off any surplus. Leave it somewhere to dry.
Instant vambrace.
Harder Projects
One advantage of water hardening is that when the piece
comes out of the water it is stretchy--more so than leather that has been
soaked for a much longer time in cold water, as described in my earlier
article. This makes it possible to form pieces. You must work quickly, since
the stretchiness goes away in a minute or two.
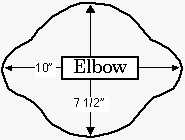
Elbow cops are easy. Start with a roughly oval shape, about
10" by 7.5", as shown in the figure. Find two bowls, diameter
about 6.5", that will nest together. When the piece comes out of the
hot water, put it into one of the bowls, forcing it down with your fingers
to stretch the leather into the bowl, then put in the other bowl, so that
the leather is being stretched between the two.
Finally, take out the inside bowl and make sure that the
leather is fitting into the other with no folds, crinkles, etc.--if necessary
smooth those out with your fingers. Let the leather dry. Sew or rivet on
straps and you have an elbow cop. For a knee cop, do the same thing, making
the piece about 14" x 7.5" and using about 7.5" diameter
bowls. Details will vary according to the size of your elbow and knee and
how thick your padding is going to be.
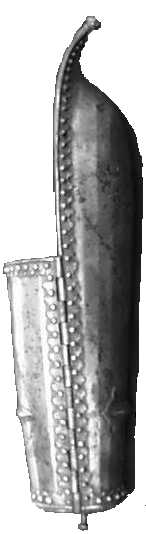
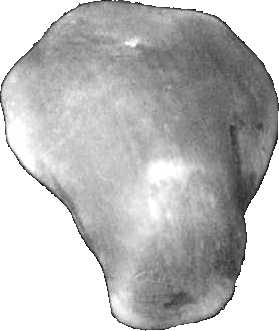
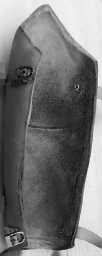
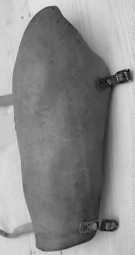
A bazuband--the Islamic forearm and elbow piece described
in the previous article and shown here--is a more complicated shape. There
are four ways to try to make it.
1. Use your arm, wrapped in a towel, as the mold. This
will probably work better with two people, giving you three hands to stretch
leather. I have not yet tried doing the initial stretching that way, although
I usually put the piece over my arm for the final adjustments.
2. A positive form. Get something roughly the shape of
the inside of the bazuband. A steel bazuband is ideal if you happen to have
one lying around, but lots of other things will do. For a less precisely
designed form, but one somewhat easier to obtain, use a wine bottle with
relatively steep shoulders.
With a positive form, you take the leather out of the hot
water and stretch it over the form. I find that it helps to tie the wrist
end of the leather around the form with strips of cloth, then do the stretching
at the elbow end, which is where it is most needed. then tie that down to
the form with strips of cloth. This is like making an elbow cop with only
one bowl, by stretching the leather over the bowl--but harder. You may find
it useful to do some preliminary stretching over a rounded corner of the
kitchen table, or something similar.
3. A negative form. Get something that is roughly the shape
of the outside of the bazuband and stretch the leather into it--like forming
your elbow cop in the inside of a bowl.
 4. Nested forms. This is the best way--once you have
the forms. I've done it using a pair of steel bazubands. They don't have
to be steel--once you have made a cuirboulli bazuband you are happy with,
you can use it as your negative form for the next one, nested onto whatever
form you used to make it.
4. Nested forms. This is the best way--once you have
the forms. I've done it using a pair of steel bazubands. They don't have
to be steel--once you have made a cuirboulli bazuband you are happy with,
you can use it as your negative form for the next one, nested onto whatever
form you used to make it.
Alternatively, you could make both positive and negative
forms out of wood--by the next version of this article, I may have finished
that project, using lengths of 2x4 sandwiched together and pegged. In theory,
you end up with forms that can be made narrower, for thin people's arms,
by removing the central piece, or wider, for big people's legs, by adding
another piece.
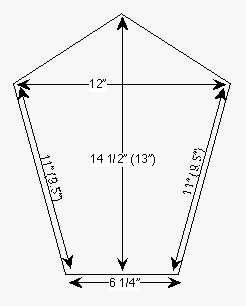
Dimensions
The figure on the next page shows a piece of leather intended
for a bazuband and top and bottom views of the completed piece; numbers
in parentheses were measured after shrinkage. My wrist circumference is
7.5", and my arm is 9" from the wrist to the tip of the elbow,
8" from the wrist to the inside of the bend of the elbow. You can experiment
with different starting shapes and forms to make different sorts of bazubands.
After doing your best you can to stretch the leather over
or into your form, you may discover that your best was not good enough--the
edge of the leather at the elbow won't fit against the form without wrinkling.
Simple Fixes
 There are two possible solutions. One is selective shrinkage.
Put the edge of the elbow end back into the hot water for another minute
or two, until it starts to get darker and shrink. With luck, you can tighten
the wrinkles away. A simpler solution, shown to the left, is to pinch the
tip of the elbow end, giving you one elegant fold instead of several inelegant
wrinkles. Hold the pinch closed with a clamp while the leather dries and
stiffens.
There are two possible solutions. One is selective shrinkage.
Put the edge of the elbow end back into the hot water for another minute
or two, until it starts to get darker and shrink. With luck, you can tighten
the wrinkles away. A simpler solution, shown to the left, is to pinch the
tip of the elbow end, giving you one elegant fold instead of several inelegant
wrinkles. Hold the pinch closed with a clamp while the leather dries and
stiffens.
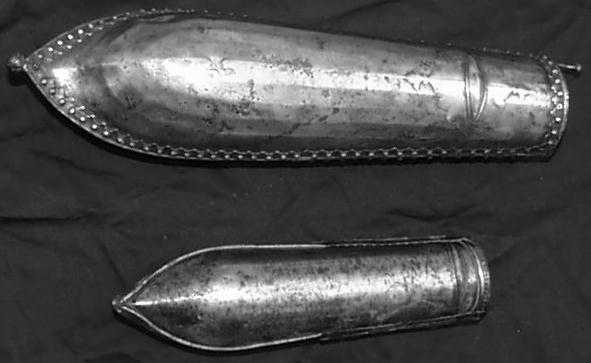
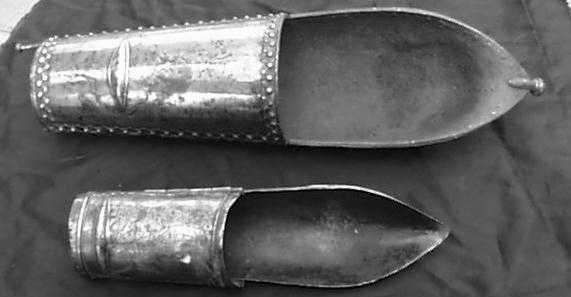
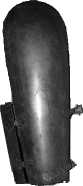
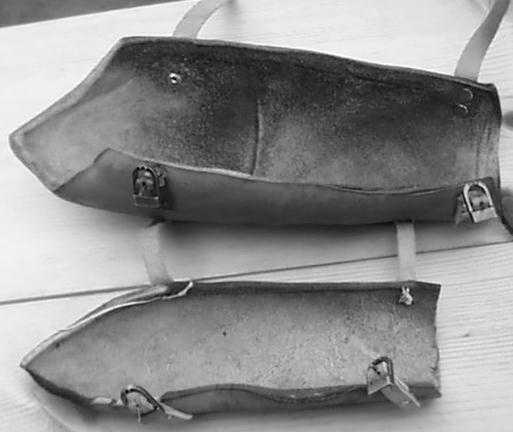
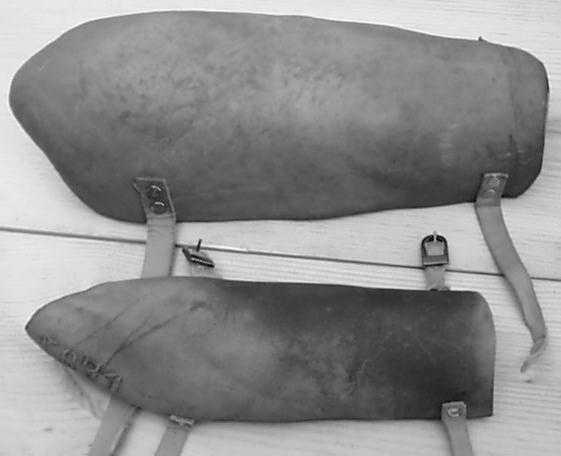
After discovering how simple the technology is it may occur
to you, if you are a parent, that cuirboulli armor is just what your five
year old would like for Christmas--and considerably less expensive than
the latest Playmobile castle. The idea is not new. The pictures below show
two father/son pairs of bazubands--one Indian, possibly 18th century, and
one a little more recent.
Doing without Bicycle Tires and Heater Hose
A simpler stretched leather project is shield edging. Start
with a strip about 3 inches wide and long enough to go around your shield
after allowing for shrinkage--or several strips that add up to enough length
if you prefer. When the leather goes limp, pull it out of the water and
stretch it tightly around the shield; it will form itself to the shield
edge in a fashion wonderous to behold. To completely eliminate non-period
materials from your shield, use many layers of scrap wool to provide padding
between the wood and the leather.
Further Details
For SCA fighting, you should probably start with at least
8 ounce leather, which the hardening process will thicken to about 10 ounce.
12-14 ounce is better--but harder to stretch over forms. In general, you
will want thicker leather over vulnerable points such as knees and elbows--which
means either starting with thicker leather or leaving your leather in the
hot water longer to get more shrinkage.
Sometimes something will go wrong; you pull the piece of
leather intended for a bazuband out of the water only to discover that it
has shrunk too much to fit your form, or that a thin section you didn't
notice has shriveled up, ruining the piece. All is not lost. Flatten the
piece out and cut it into lamellae. Enough mistakes and you have a free
klibanian.
One minor problem with the process is that the leather
gradually turns the water you are using brown. For a simple project, such
as making lamellae, this may be tolerable; you can stir the piece of leather
to the top of the pot every ten seconds or so to check its condition. For
something more complicated, such as a bazuband or greaves, you may want
to heat fresh water for each piece--which is a nuisance but makes it easier
to see what you are doing.
For the Future
I am fairly sure that water hardened cuirboulli, starting
with 14 oz leather, would be adequate for gauntlets but I have not yet made
any. Starting with even thicker leather I could probably make a workable
helmet--but I doubt I could talk the marshalls into letting me use it. I
do, however, plan to fight at Pennsic this year wearing my brand new cuirboulli
cup.
Cuirboulli can also serve a variety of more peaceful purposes.
Think of it as a medieval plastic-literally true, if you take "plastic"
in its general sense and consider the condition of the leather immediately
after it comes out of the water.